
By. Joshua Barclay
Introduction
Connecting solar energy to a school or campus electrical grid has benefits well beyond carbon emission reductions that result from replacing fossil fuels with solar. In many areas, school districts and other tax-exempt organizations can take advantage of beneficial public-private partnerships such as solar leases and power purchase agreements (PPAs) to save money by converting to solar, all while creating a real-life, project-based cornucopia of educational opportunities. At West Bloomfield High School (WBHS) in Michigan, finding solutions to the climate crisis creates multiple opportunities for cross-curricular, project-based learning and cooperation between school clubs and classes.
This article focuses on one project in particular – an effort by WBHS students to power the science department with solar electricity. Called “Student-Driven Solar,” this project took place over two years and involved over forty members of the EARTH Club (Environmentally Aware, Ready To Help) who collaborated with more than a hundred other students in physics, engineering, computer science, art, and video classes. This project required students to apply science, technology, engineering, art, and mathematics to answer the real-life question, “How do you power a school with solar energy?”
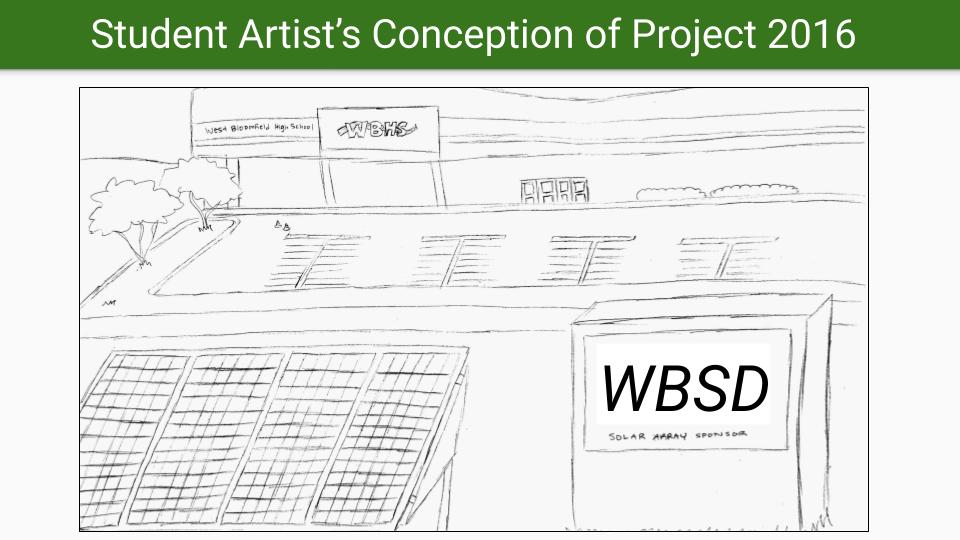
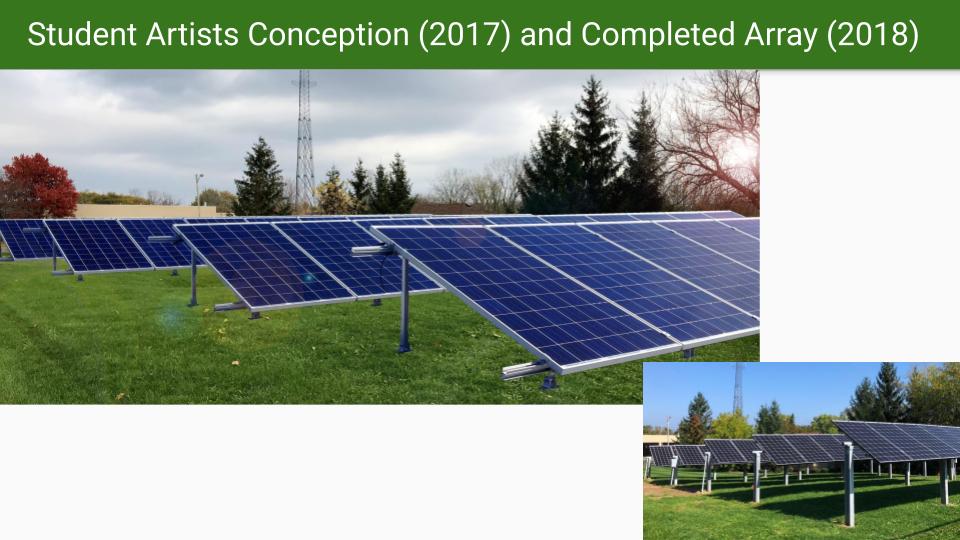
The project was first conceived in September 2016 over the course of several EARTH Club meetings. The goal was to power the WBHS science department with solar electricity by 2020. EARTH Club members performed the final installation of a 20 kW solar array in 2018, over two years ahead of schedule. The students’ relatively rapid success was primarily due to the advantages of a solar lease financing option. I also believe their rapid success was due to having a clear, tangible, and relatable goal of “solar powering the science department.” I have found this “powering one area” idea to be a very useful conceptual goal-setting technique, especially when fundraising. Whether you are trying to power one classroom, one department, or an entire school, in practice, you can connect a solar array anywhere on your school’s grid, and as long as the array generates enough energy to offset your intended load, you have powered that load with solar!
It should be noted that in almost every case, energy efficiency measures pay off faster and at lower cost than renewable energy installations. Just switching to LED lights can reduce facility energy use by 30 – 50% and 10 – 20% for cooling. Before project implementation, we gained assurances from the school district that LED lighting retrofits and other efficiency measures would be performed over the next several years.
Step 1: Energy Audit
From 2016 – 2018, my Honors Physics classes performed an energy audit of all science classrooms to determine the science department’s annual electricity use and cost. To do the energy audit, students used “Kill-a-Watt” brand power meters to measure the power demand of every electrical device in each science classroom for both “turned on” and “turned off” conditions (many devices use energy when they are turned off but still plugged in). Students interviewed teachers to determine how long each device was turned on and off during a typical day. They then calculated daily and yearly energy use for each device, for on and off conditions, as well as total annual energy use and cost. Summary data was entered into a master spreadsheet so students could do graphical analysis of the data.
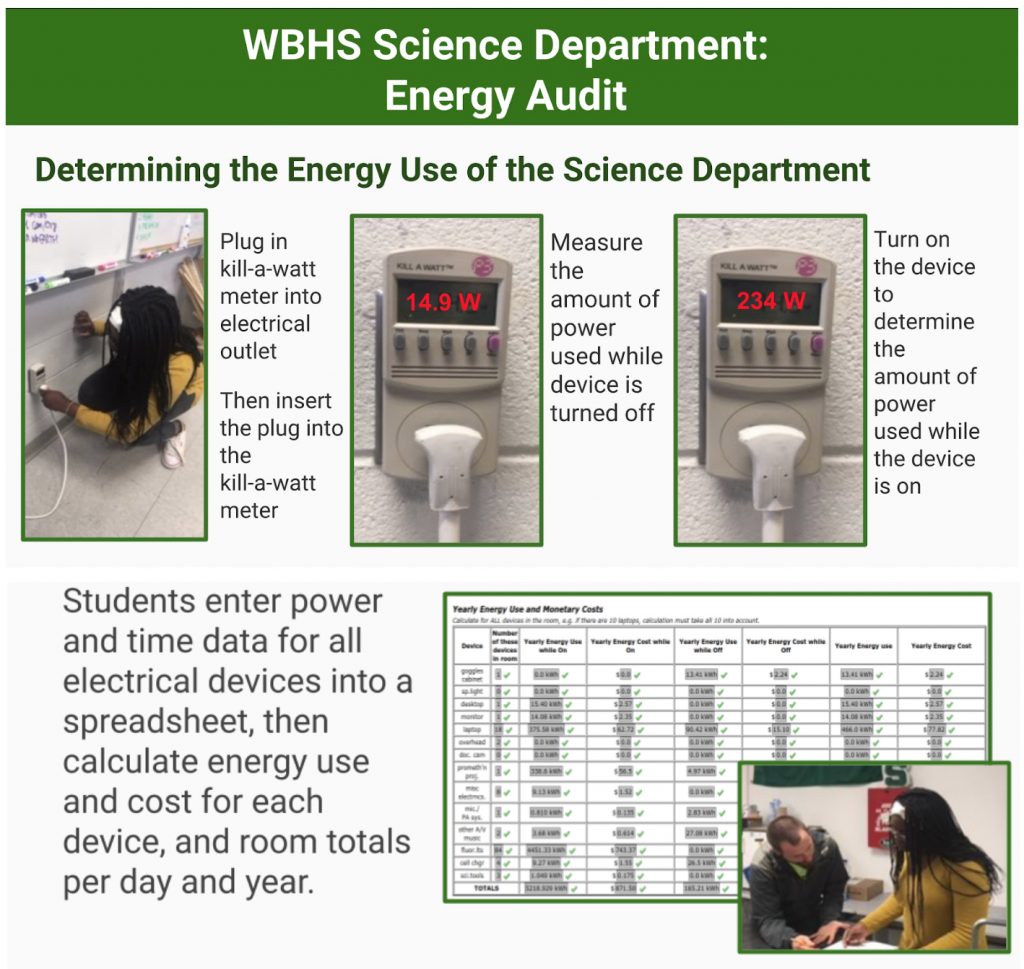
After initial analysis and data compilation by the Honors Physics classes, an AP Physics student used the data to create the chart below that summarizes the energy audit’s results and proposes how new solar generation might supply the measured demand. As the chart indicates, students found that the vast majority of the science department’s energy use came from the fluorescent lighting system. The next highest energy use came from the electronic smart boards used in every classroom. Since our school district already planned to replace the fluorescent lights with LEDs and upgrade smart boards to another model with much lower phantom power demand, a solar installation made sense.

Access a Google sheets template and other useful information to help you conduct an energy audit with your students.
Step 2: Solar Resource Study – Where to Put a Solar Array?
After completing the energy audit, the EARTH Club Engineering team set out to identify the best place to put a solar array on the school’s campus. Considerations included not only the available solar resource (i.e., how much sun the area receives) but also proximity to the school’s electrical infrastructure. Students created a detailed campus map using Google maps and a superimposed map of the school showing the locations of electrical boxes.
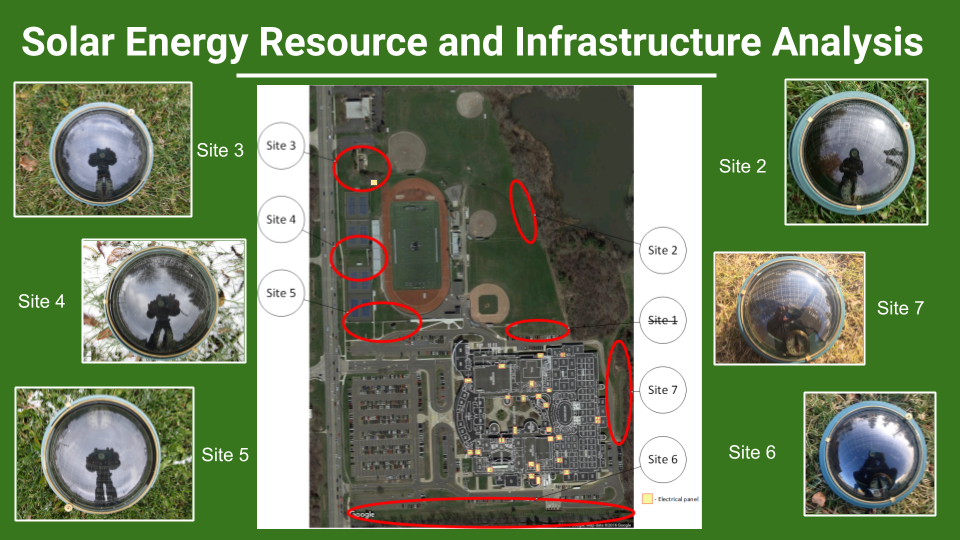
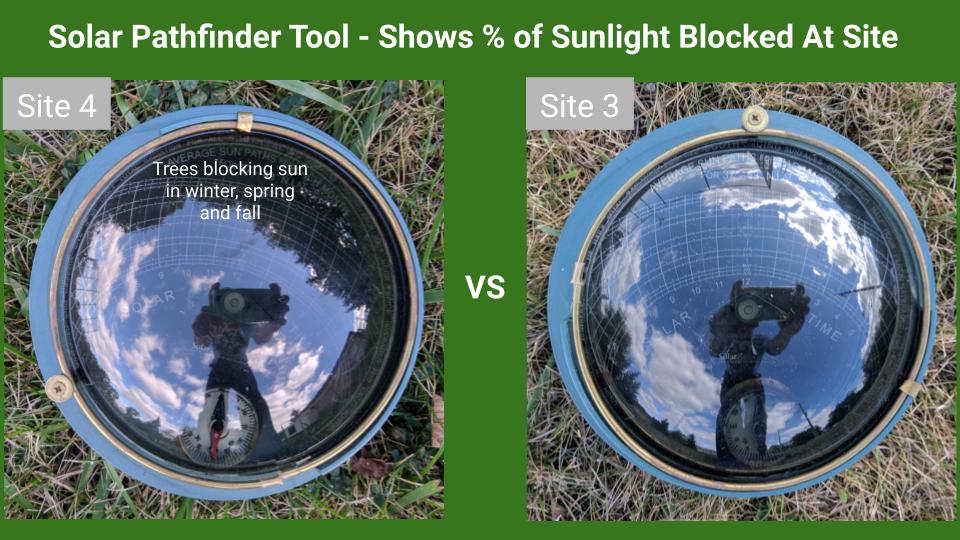
Students then identified possible sites for a ground-mounted array using a Solar Pathfinder, a tool which helps determine the annual solar radiation at the site being studied. The Solar Pathfinder is essentially a clear dome which reflects the surroundings to show how much solar radiation would be blocked during specific months. For example, in the image below, the reflection of the surroundings from the Solar Pathfinder shows that Site 4 has trees blocking the sun for many hours of the day during winter, spring, and fall, while Site 3 has much less solar obstruction.
View the full solar resource study and a video of students explaining the process.
Ultimately, EARTH Club students chose Site 3 because it had the fewest trees and was located next to an electrical shed that housed one of the campus’s main electric meters. Professional installers concurred with the students’ decision.
You can access free and low-cost smartphone apps that can be used just like a Solar Pathfinder to help you assess your site’s solar resources. A good place to start is the PVWatts Calculator, which can give you information about your site’s solar resource just by entering your address.
Step 3: Projecting Benefits
EARTH Club students used their math, chemistry, and physics knowledge to calculate the economic and financial benefits of installing a new solar array. Below are the students’ calculations, which were presented to the West Bloomfield Educational Foundation.
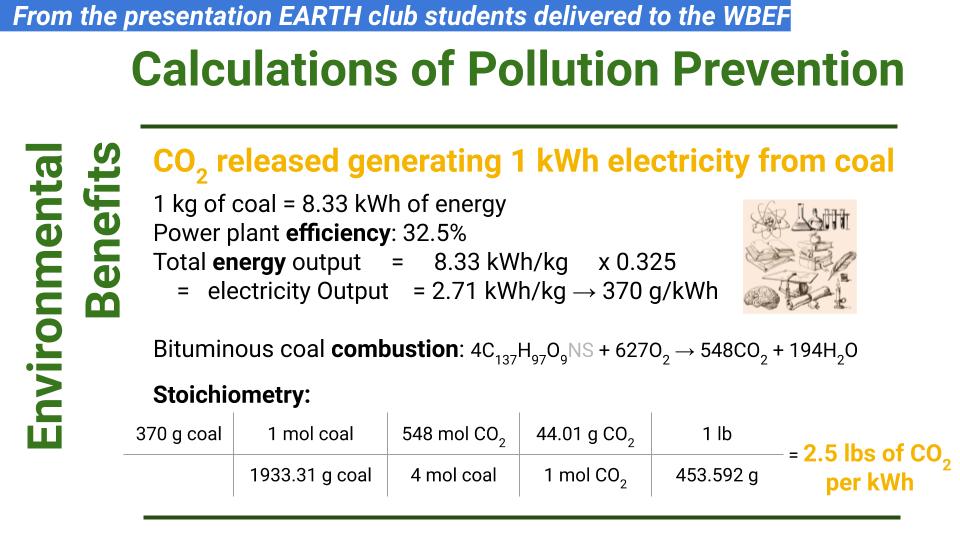
To determine reduction in carbon emissions, students researched the amount of energy in a kilogram of bituminous coal and coal plant efficiency. Using concepts from physics, they determined the actual electrical energy output of a kilogram of coal. Then, using stoichiometry from chemistry, students determined that 1 kWh of coal generation would produce 2.5 pounds of carbon dioxide. Additional calculations showed that that the proposed 20 kW array would generate 24,000 kWh of electrical energy each year. This would prevent the emission of 30 tons of CO2 annually and potentially save the school district $65,000 over the 25-year warrantied life of the array.
Step 4: Student Presentations
Students gave over a dozen presentations to obtain school board and community support for the project. They presented to stakeholders, environmental organizations, potential donors, community members, and the Board of Education. They even gave a presentation to an elementary class that was visiting the school to learn about the solar array. These presentations were assuredly the primary path to the project’s success. Students used data and reasoning to defend their claims of the importance and necessity of the solar array to reduce carbon emissions and used persuasive speech to gain support for their efforts. A large fraction of the $25,000 the students ultimately raised was a direct result of these presentations. View some of the presentations and promotions created by the students.
In addition to the student presentations, the EARTH Club website provided project information, documentation (on our student-written blog), a location for supporters to make donations and monitor the project’s progress, and connections to EARTH Club on other social media platforms.
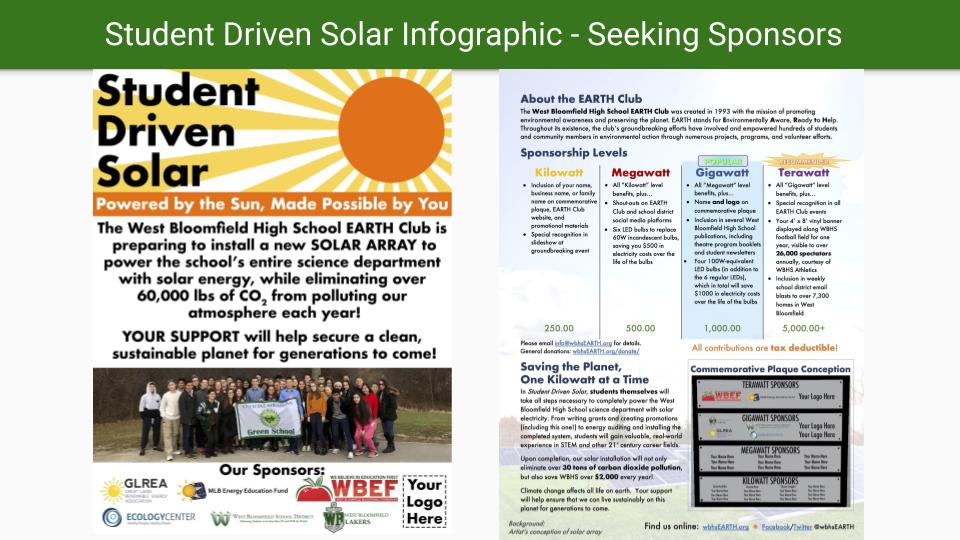
Step 5: Fundraising
After determining that 20 kW would be sufficient for the science department’s electrical needs, we proceeded to solicit bids from local contractors. For a fully installed 20 kW system, bids ranged from $50,000 to $70,000. EARTH Club students projected that such a massive fundraising task would take four or more years, so an early name for the project was “20 kW by 2020.”
The majority of project funding came from grants. As expected, we applied for many more grants than we won. However, the unsuccessful grant applications allowed us to hone and improve our project proposals and steadily gain more sponsors. This made the project all the more attractive to potential donors in the long run. The grant-writing experience was exceptionally valuable to students. To keep grant-seeking efforts organized, we used a spreadsheet that showed students assigned to each task, grant due dates, and progress.
EARTH Club students also conducted many small fundraisers to raise funds for the project. These included bagel sales, pizza slice sales, restaurant fundraisers, Equal Exchange Fair Trade Product sales, engraved paver sales, and more. Our biggest individual fundraiser was a crowdfunding campaign using Youcaring.com (which has since been bought by GoFundMe), raising over $5,000. Learn more about how we organized and implemented the crowdfunding campaign and all our fundraisers.
Step 6: The Miracle Funding Mechanism
Students raised nearly $25,000 after almost two years, but outright purchase and installation of a 20 kW solar array would cost at least double that amount. Fortunately, we discovered a funding mechanism called a solar lease that allowed us to install immediately with cash on hand. With a solar lease or PPA, a school, home, or business may be able to get solar panels installed with $0 upfront costs and still pay less per kilowatt-hour than utilities currently charge. Though it seems too good to be true, it’s definitely real and available in at least 26 states (learn more about solar leases and PPAs here and here).
The difference between a solar lease and a PPA is somewhat subtle, but for either financing mechanism you essentially pay for the energy that the solar array generates. The installer owns and maintains the equipment and can therefore take advantage of renewable energy incentives and tax deductions, which are typically not available for public institutions like schools. The installer can still profit off of the electricity sold, even though the cost to the school is 10 – 30% cheaper than the electric utility charges. If your area has a solar lease or PPA available, this may be the cheapest and fastest way to get a solar array installed and may not require you to raise ANY money.
With our solar lease, the district leased a new solar array for a 5.6 year period and instantly saved 10% compared to utility pricing for electricity generated by the array. Though not always necessary with a solar lease, we used $21,000 from our fundraising efforts to pay an “upfront buyout.” By paying this money, after the short lease period ends, the EARTH Club owns the used array. Basically, the club is buying a used array for a steeply discounted price, but paying upfront, before installation. Without the upfront buyout option, a lease or PPA will typically last longer, up to 20 or 25 years.
As one of the first schools in Michigan to use a solar lease funding mechanism, we encountered concern and hesitation from our assistant superintendent for business operations. However, we were able to win approval after confirming the mechanism’s legality and presenting the option to the school board. This was an easier route to take since we weren’t asking for any monetary support, only permission to start saving the school district 10% for each kilowatt-hour generated by the array.
Step 7: Installation
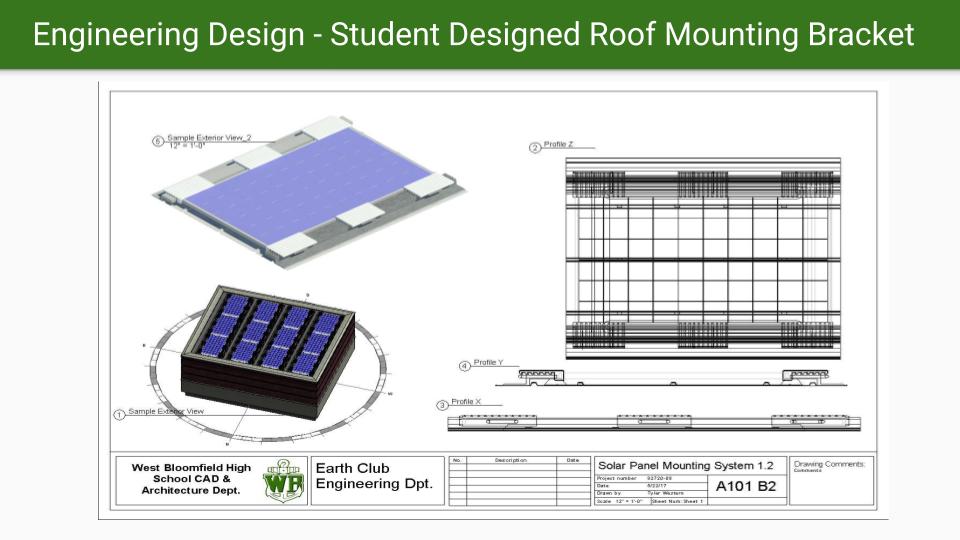
Students took part in the solar array’s installation. Our solar installer was very accommodating of our educational goals and agreed to first install all ground-mount hardware. Then, with guardian permission, students could participate in the installation of the solar panels. You can watch a video of the installation on YouTube. Choosing a ground mount instead of a roof mount provided several benefits. It allowed students to be involved in the construction and will allow them to manually adjust the angle of the panels for science experiments. The option alleviated administrative concerns about roof leakage and eliminated problems with insurance for having students work on the roof. And, the ground mount is a publicly visible installation and can be easily seen by community members as they drive by the school. We have found that installations that are out of sight are often kept out of mind of the community, so the publicly visible ground mount served our educational purposes perfectly. Ground mounts can be slightly more expensive, but this was less of a concern with the solar lease method, since the bulk of the costs were borne by the installer.
Epilogue
Students presented their results to the community at a Solar Celebration (which can be seen on this YouTube video) and hosted an elementary school field trip to share their work with younger students.
This year, students in EARTH Club and physics classes continue to engage in real science and community activism involving the solar array. EARTH Club students recently testified in front of the Michigan State Senate Energy and Technology Committee about legislation involving distributed generation and power for schools with solar energy in Michigan. AP Physics students will be conducting a study to determine the optimal angle to tilt the solar array to maximize annual energy production. Physics students will be electrically wiring small model houses and powering them with a 360 W solar photovoltaic and battery-based system.
View a Google Slides presentation which details the entire two-plus year process.
Author Bio
Joshua Barclay, M.S., has enjoyed teaching since 1987. In 2016, he was honored as MSTA Michigan High School Science Teacher of the Year. His “Phreestyle Physics – University Physics to a Hip-Hop Beat” YouTube channel provides a full university physics curriculum, peppered with music videos, freestyles, and rap battles with students and other teachers. He has given numerous presentations about teaching and renewable energy seen at http://bit.ly/barclay-presentations. He also enjoys giving guided tours of the night sky. Joshua lives with his wife in their renewably powered home in southeast Michigan.